Have you ever come across something on your iPad that you wanted to capture and keep as a visual memory? Perhaps it was a stunning image, a hilarious conversation, or important information that you wanted to save. But did you find yourself pondering how to take screenshot on any iPad? If yes, then don’t worry, pal! In this article, I’ll tell you many different ways to take screenshots on your iPad. So are you ready to dive into the guide that empowers you to capture whatever you want effortlessly? Keep reading.
How to Take Screenshot on Any iPad?
Yes, you have read the correct heading. I’ve come up with different ways to capture your screen on any iPad. But before moving to them, keep the screen open that you want to capture before taking the screenshot.
Now, let’s move to the methods.
Home Button
Do you have an iPad with a home button? If yes, then let me tell you that you can use this home button to capture your screen. And the steps for doing that are:
1. Press the home button (located at the centre of your device’s bezel) and the top button simultaneously for a bit.

2. And that’s all.
| Note: Apple introduced the iPad Pro without the home button in 2018. And since that release, all iPads have come without the home button. So don’t get worried if you can’t find it on your device. |
Power button and Volume Button
This method is more like the first one. You need to press two buttons simultaneously, but the combination is different.
1. Press down the power key and volume down or up key at the same time.

2. Release the buttons once your iPad screen flashes white and a shutter sound comes.
Ask Siri
Siri is a virtual voice assistant available on various Apple devices, including iPads. To take a screenshot using this voice command assistant, do this:
1. Hold the power button for a few seconds to activate Siri.

2. Command Siri to capture your screen by saying, “Hey Siri, take a screenshot,” “Take a screenshot,” or something like this.
Apple Pencil
To capture your screen using an Apple pencil, make sure it is connected to your device. Once it’s connected, follow these steps:
1. Open the Settings app.
2. Go to the apple pencil section.
3. Now, select the pencil gestures as per your preferences.
- If you want to take a screenshot by dragging from the left, select Screenshot there.
- To take a screenshot by dragging from the right, select the screenshot in this section.

4. After setting up the gestures, swipe your pencil from your iPad’s bottom left or right corner to the centre (diagonally).
And there you are! The screenshot will be taken successfully.
Assistive Touch
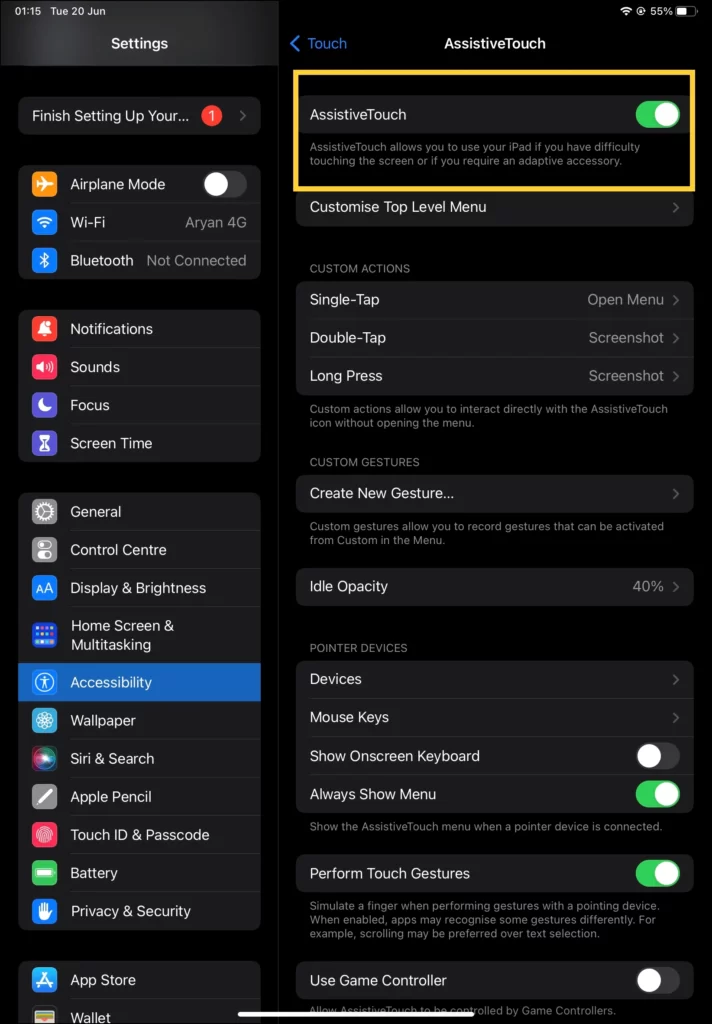
AssistiveTouch is an accessibility feature that provides an on-screen virtual button to provide access to a variety of device functions with ease. But you have to activate it to utilise it for capturing your screen. Here are the instructions for that:
1. Open the Settings app.
2. Go to the Accessibility tab.
3. Under the accessibility tab, click on Touch.

4. Press the AssistiveTouch option.

5. Turn the toggle switch on. And that’s all its takes to activate the feature.

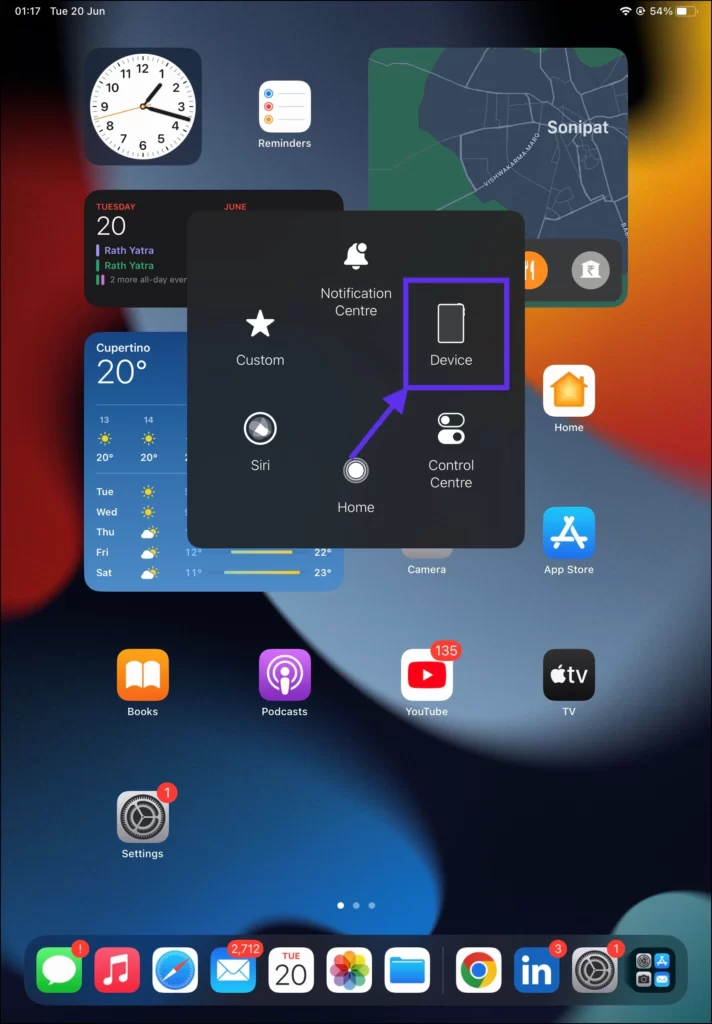
Once you have activated AssistiveTouch, follow these instructions to capture a screenshot:
1. Click on the circle icon that appears on your screen.

2. Tap on the device from the given options.

3. Then, click on the “Screenshot” option.

4. If you don’t see the “Screenshot” option, tap on “More” to access additional functions, and you’ll find it there.

Custom Actions
It’s a quick shortcut that will let you capture your screen with a single touch. Under the AssistiveTouch tab, “single-tap, double-tap, and long press” options are provided. By assigning the “screenshot” function to any of these actions, you can take a screenshot by performing that selected action.

For example, let’s say you select “screenshot” under the single-tap action. In this case, you just need to tap the assistive touch icon once to capture your display.
Similarly, if you opt for “screenshot” under long press or double-tap, you can capture your screen by performing the same action.
Touch Picture
Saving pictures from any browser on your Apple device is a breeze. Here’s how you can do it:
1. Click on the image you want to save for a few seconds.
2. Tap on the Save option from the menu appearing on your display.
Keyboard shortcut
Do you have an Apple keyboard with your iPad? If yes, then you can use the following shortcut to capture your display:
1. Press down the cmd (command) + shift + 4 keys together.
2. Select the area you want to capture.
3. Release all the keys.
Gestures
Not only with a pencil, but you can also take a screenshot with your fingers by swiping from the bottom left or right to the centre of your display. However, you have to adjust your device’s settings a bit to enable this function.
Here’s what you need to do:
1. Go to the General tab in your settings.
2. Hit the Gestures option there.

3. Select the action to screenshot in the “Left Corner Swipe” and “Right Corner Swipe” options.

4. After this, you can diagonally swipe your finger from your display’s bottom left or right corner to the centre to take the screenshot.
Wrapping Up: Take Screenshot on iPad
Screenshots hold the power to freeze time by preserving the digital moments that matter to you. So don’t think about how to take a screenshot on your iPad before capturing your screen. You can do it with some simple touches mentioned in this article and capture anything you want effortlessly. I hope you find this article helpful; if so, share it with your friends and family.
Related:


